The iPhone camera is a rival to professional DSLRs, but even amateur photographers can get more out of their photos with the right compositional guidelines. One of these is the rule of thirds.
The rule of thirds states that important subjects should be placed along the lines or at the intersections where they intersect. This can add balance to your photos and make them look more interesting.
How to Turn on the Grid
If you’re an iPhone photographer, you might have heard about a camera feature that’s built into the device called the grid. Many people turn this feature on to take better photos. It’s an easy way to apply the rule of thirds, which can help make your images look more professional.
The rule of thirds is an important photography technique that has been used in art since the 18th century. It suggests that your subject should be placed along one of the three lines or their intersections, which creates a more balanced picture. The grid on your iPhone camera is a great tool for applying this concept to your photos, and it’s easy to enable and use.
To turn the grid on, you need to launch the Settings app from your iOS device’s home screen. The app has a gray cog-shaped icon that you can locate on your Home screen or search for via the search bar.
Once in the Settings app, scroll down until you find the option to turn on the grid. It’s located under the Composition category. Tap it to turn it on, and you’ll see a white grid appear over your capture frame.
While the grid isn’t a must-have feature for every iPhone user, it can be an effective addition to any amateur photographer’s arsenal. The grid is a great way to help apply the rule of thirds, and it’s easy to enable on any iPhone model.
Using the grid on an iPhone is a great way to take photos that are more organized and professional-looking. It’s also a great way to help improve your overall photo composition.
It’s also an important photography technique, so it’s worth learning how to apply it properly. It’s a simple guideline that can make your photos more appealing to viewers and increase the likelihood that you’ll get some traction on Instagram.
If you’re an iPhone photographer, it’s important to learn how to apply the rule of thirds. The rule of thirds is an important photography concept that has been used in art since the 18th Century. It suggests that your subject should be placed in the left or right third of a picture. The grid on your iPhone camera is an easy way to apply this concept to your photos, and it’s a great way to help improve your overall image composition.
Enabling the Grid
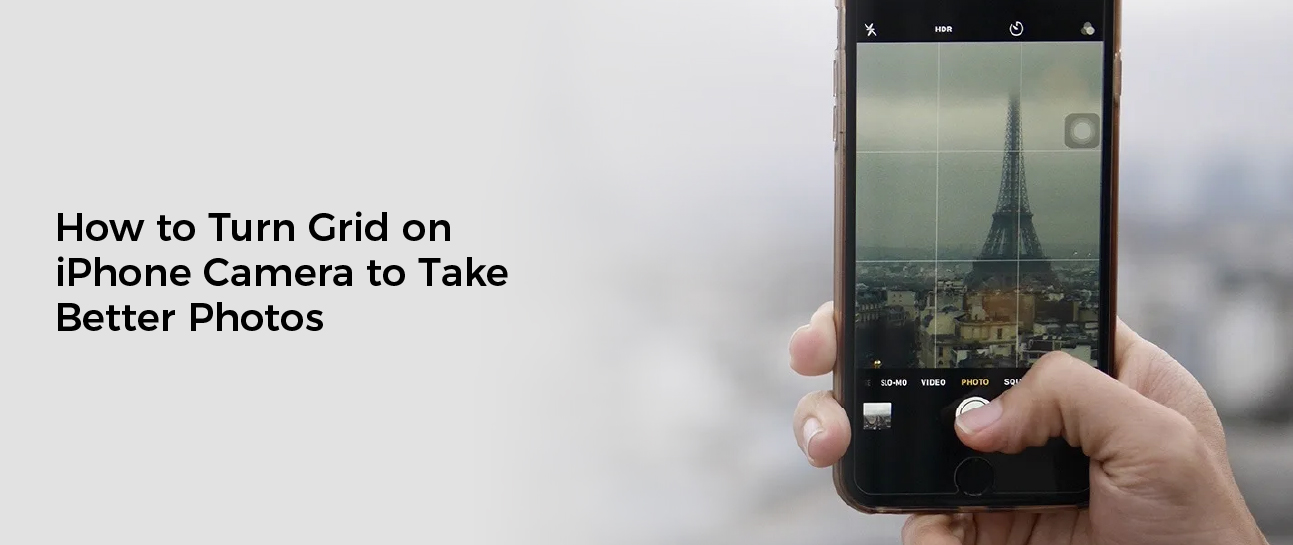
If you want to take better photos with your iPhone camera, the grid is a useful feature to enable. The grid overlays four lines across the screen of the Camera app that overlap to create nine squares.
The idea behind the grid is that it helps you orient your screen so that all of the elements in the photo are balanced. This can help you take professional-level photos that will look sexier than your average iPhone shot.
While the grid can be a helpful tool, it does have its limitations. For one thing, the grid isn’t always visible on all models of iPhones. This could be because of the pixel density of your display or your phone’s case or screen protector.
In addition, the grid may not be helpful if your subject is too far away from the camera. In that case, it’s best to use the rule of thirds when taking a picture with this feature.
To turn on the grid, you’ll need to enable it in the Settings app. This can be done by opening the Settings app and tapping on “Photos & Camera.” Then, you’ll need to scroll down and tap on the “Grid” toggle.
Once you’ve enabled the grid, you can see a 3 x 3 grid overlaid on top of the viewfinder anytime you open the Camera app. The grid can be a great help in framing pictures with people or other subjects.
The grid is based on the “rule of thirds,” which has been used in artwork since the 18th century. The rule states that the focal point of a photograph should be placed at the intersections of the grid lines, creating an image that is more powerful and aesthetically pleasing to viewers.
However, this rule isn’t always accurate or easy to follow. That’s why it’s important to keep an open mind and try different things.
To enable the grid on an iPhone, you’ll need to open the Settings app and tap on “Photos & Camera.” Then, scroll down and tap on the “Grid” button. When you do, the grid will be turned on and you’ll see a green “Grid” slider at the bottom of the screen.
Using the Grid
The grid on your iPhone camera is an extremely useful tool for anyone who wants to take better photos. It helps align horizons and other elements of the frame in accordance with the rule of thirds, which is an excellent way to make your pictures more compelling and pleasing to view.
It can also be used to create a more balanced photo, which is important for Instagram and other social media platforms. By dividing the frame into nine sections, you can easily follow the rule of thirds and place your subject where horizontal and vertical lines intersect. This can help you capture a more appealing image, and can even make your photos look much more dramatic.
You can also use the grid for capturing other types of photos, such as portraits or landscapes. This can be especially helpful for people who want to use the app’s auto-cropping feature.
To enable grid on your iPhone camera, tap the Settings icon and select Camera. Once you’ve turned it on, the camera will display a faint grid over your captured frames. This will give you a clearer idea of what your shot will look like before you hit the shutter button.
Another great use for the grid is in the Notes app on your iPhone or iPad. The lines and grids in the app can simulate the look of a notebook, or allow you to draw straight lines or other geometric shapes. They’re also available in different configurations, including single-spaced, double-spaced, and triple-spaced lines.
When creating a new note, you can choose which lines and grids to use by tapping the More button at the top of the app, followed by Lines & Grids. Once you’ve selected your preferred line or grid style, every new note will feature this option.
Taking Photos with the Grid
The grid is an excellent tool for enhancing the composition of your photos and giving them more interest. It is based on the rule of thirds, and it can be applied to both portraits and landscapes.
Whether you’re an experienced photographer or just starting out, the camera grid on your iPhone can help you take better photos. You can find the option to turn it on in the settings for the Camera app.
You can see a 3 x 3 grid overlay on the screen anytime you open the Camera app. Enabling the grid can make it much easier to properly frame your images, and it also helps you apply the rule of thirds in a more practical way.
When taking landscape photos, it is often a good idea to place the horizon line on the lower grid line, since that will give the viewer more space in the image. This will also draw attention to the beautiful sky, which is a great addition to any photo.
If you’re shooting a portrait, the camera grid is a great way to help you position your subject’s eyes, which are usually the most important part of the image. Using the camera grid to align the eyes with lines on different sides of the screen draws attention to them in a more subtle, artistic way.
In fact, this method of framing a picture is actually preferred by many professional photographers. While it is common to see a person’s face placed in the center of a picture, placing them on the top horizontal and left vertical grid lines can help them look more striking.
This is a good technique for any photo, but it’s particularly effective for portraits. When a subject’s face is centered on the top horizontal grid line, their eyes are positioned along the bottom of that grid, making them appear more prominent to viewers.
While this is an easy step to take, it’s still best to remember that the grid doesn’t have to be used in every photo. It can be a helpful guide when you’re first starting out, but you should experiment with it and see what works best for you.