


Are you tired of receiving unwanted emails on your iPhone? Well, you’re in luck! In this step-by-step guide, we will show you how to block emails on your iPhone, putting an end to those pesky messages once and for all.
By following these simple instructions, you will regain control of your inbox and enjoy a clutter-free email experience.
First, we will walk you through accessing the Mail app on your iPhone.
Next, we will show you how to identify unwanted emails and block senders directly from your inbox.
Additionally, we will guide you on managing your blocked senders list, ensuring that no unwanted emails slip through the cracks.
Finally, we will teach you how to adjust your email settings for enhanced filtering, providing an extra layer of protection against unwanted messages.
So, let’s get started and take back control of your iPhone’s inbox!
Accessing the Mail App on Your iPhone
Now, let’s jump into the fun part – getting into the nifty Mail app on your trusty iPhone!nnFirst, locate the Mail app icon on your home screen. It looks like a white envelope with a blue outline.nnTap on it to open the app.nnOnce you’re in the Mail app, you’ll see your inbox with all your emails listed.nnTo access the settings, tap on the hamburger menu icon in the top-left corner of the screen.nnThis will open a sidebar with different options.nnScroll down and find ‘Settings’ – it has a gear icon.nnTap on it to open the Mail settings.nnHere, you can find various options to customize your email experience, including blocking specific email addresses.
Identifying Unwanted Emails
To effectively deal with bothersome messages, it’s essential to recognize and label unwanted emails on your iPhone. Start by opening the Mail app and selecting the inbox where the unwanted email is located. Scroll through your emails and look for any messages that you don’t recognize or don’t want to receive.
Pay attention to subject lines, senders, and email content that seem suspicious or irrelevant. Once you’ve identified an unwanted email, tap on it to open it. If it’s a spam or junk email, you can mark it as such by tapping on the ‘Mark’ option and selecting ‘Mark as Junk’ or ‘Mark as Spam.’
This will help your iPhone’s filters identify similar emails in the future and send them directly to your spam folder.
Blocking Senders from Your Inbox
If you’re tired of receiving unwanted messages, it’s time to put an end to them by keeping annoying senders out of your inbox. Blocking senders on your iPhone is a simple and effective way to filter out those unwanted emails.
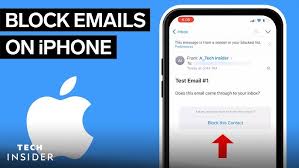
To begin, open the Mail app on your iPhone and navigate to your inbox. Find the email from the sender you wish to block, and swipe left on their name or email address. This will reveal a ‘Block’ option. Tap on it, and a confirmation message will appear. Press ‘Block this Contact’ to confirm your choice.
From now on, all emails from that sender will automatically be sent to your trash folder, keeping your inbox free from their bothersome messages. You can always unblock a sender later if you change your mind.
Managing Blocked Senders List
Once you’ve blocked a sender, take control of your inbox by managing your blocked senders list. To do this, open the Settings app on your iPhone and scroll down to find the ‘Mail’ option. Tap on it and then select ‘Blocked Senders’ from the list.
Here, you’ll see a list of all the senders you’ve blocked. To remove someone from the blocked senders list, simply swipe left on their name and tap on the ‘Unblock’ button that appears.
If you want to add more senders to the blocked list, tap on the ‘Add New…’ option and enter the email address or contact name of the sender you wish to block.
By managing your blocked senders list, you can ensure that unwanted emails stay out of your inbox.
Adjusting Email Settings for Enhanced Filtering
Customize your email settings to enhance filtering and ensure a stress-free inbox experience. With a few adjustments, you can have greater control over what emails make it to your inbox.
Start by opening the Settings app on your iPhone and tapping on Mail. Under Mail, select Blocked Sender Options and then choose the level of filtering you desire. You can opt for stricter filtering by enabling the ‘Move to Blocked Sender’ option for suspected spam emails.
Additionally, you can choose to block emails from specific domains or email addresses by adding them to your blocked senders list. Remember to periodically review your blocked senders list to remove any addresses or domains that you no longer wish to block.
These simple adjustments will help you keep your inbox clutter-free and ensure that only the emails you want to receive make it through.
Frequently Asked Questions
Can I block emails from a specific domain on my iPhone?
Yes, you can block emails from a specific domain on your iPhone. Just go to the settings of your email app, select “Blocked” or “Blocked Senders,” and add the domain you want to block.
Will blocking a sender on my iPhone also block them on other devices?
Yes, blocking a sender on your iPhone will also block them on other devices connected to the same email account. This ensures that you won’t receive emails from the blocked sender on any device.
How can I unblock a sender that I previously blocked on my iPhone?
To unblock a sender on your iPhone, go to the “Settings” app, tap on “Mail” and then “Blocked.” Find the sender’s email address and swipe left on it, then tap “Unblock.”
Can I set up a filter to automatically block emails that contain certain keywords or phrases?
Yes, you can set up a filter on your iPhone to automatically block emails that contain specific keywords or phrases. This can help to reduce unwanted emails and keep your inbox organized.
Is there a limit to the number of senders I can block on my iPhone?
There is no limit to the number of senders you can block on your iPhone. You can keep blocking as many senders as you want to prevent their emails from reaching your inbox.
Conclusion
In conclusion, blocking unwanted emails on your iPhone is a simple and effective way to maintain a clutter-free inbox. By accessing the Mail app and identifying unwanted emails, you can easily block senders and manage your blocked senders list.
Additionally, adjusting your email settings for enhanced filtering can further enhance your email management experience. With these steps, you can take control of your inbox and ensure that only the emails you want to see make it through.